Background
Last sprint, we’ve started a new group game project called Tryall. A twin-stick shooter similar to Enter the Gungeon or Megabonk.
Last sprint was a shorter one, and also was filled with some prep work as we formed our team, but I got a player character working, with controls mapped for gamepad and controller, as well as two very basic spells working. This sprint, we were focussed on getting enough behavior to have a playable gameplay loop that we can give to playtesters.
Aiming
Last sprint, I began studying the “Deproject Screen to World” node to get a look target from the mouse cursor. as I was anticipating aiming to be complicated. To get the player to aim at that point, we can simply use the “Make Rot from ZX” node (to be honest the exact inner workings of this function and the order to apply parameters still confuses me, but I’ve found a setup that works), specifying the up parameter and vector from the player to the aim target to look at.
This works for mouse (with caveats we’ll get to later on) but I still have yet to tackle controller input. As our camera was generally supposed to be top down, it could have been simpler to just rotate across the Z-axis by the angle of the controller. But the pedantic in me was wondering what if the camera was oriented differently around the player, everything would fall apart.
So going through different solutions, I’ve found the best way to find the rotation angle relative to the camera is to use the same “Make Rot from ZX” node, though plugging in the camera’s right and up vectors scaled by the joystick’s X and Y axes.
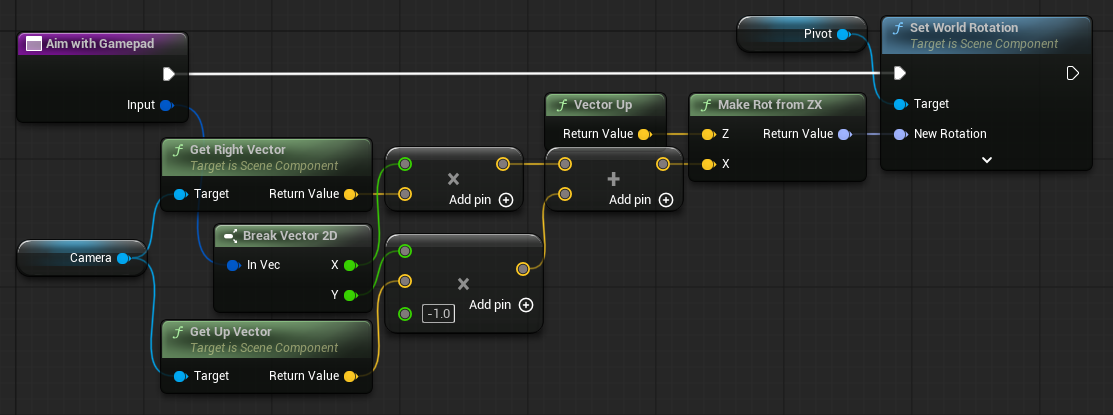
similar to the mouse controller, using the camera’s directional vectors scaled by the controller input, we can create a rotator. Pivot is a component containing the player character and collider, so the camera can rotate independantly.
Now back to the caveat mentioned before. If the player reached the end of the map, and there was nothing for the mouse to intersect with, or if the camera was at an oblique angle facing the sky (likely a very fringe example), there’d be no aim target to orient the player to face.
For the first case, I decided I’d raycast, not to any objects, but to a play that sits at the player’s height. Surprisingly, this is somethine that Unreal has built-in so I didn’t need to recreate it. But this allows us to capture the mouse target when there is no object or collider under the mouse.
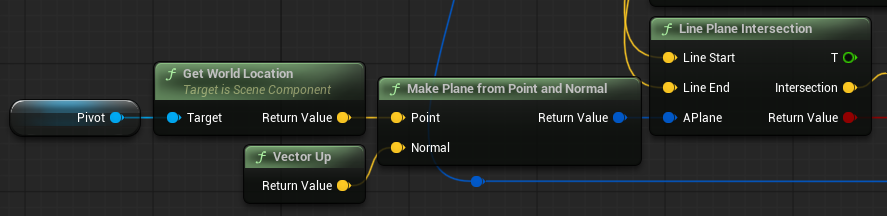
We can create a plane that intersects the player, then raycast to it.
Finally, when the mouse is aimed in the sky, and never intersects the play, we can simply grab the vector coming from the camera, and feed just that to the Make Rot from ZX node, covering all edge cases. Now the mouse aims regardless of how dynamic and dramatic the camera angle is (which makes me wonder whether we actually should have a camera that moves more dynamically now).
Now, we have both gamepad aiming and mouse aiming, but there is one last thing I still needed to tackle before completing this feature: seamlessly switching between the two controls.
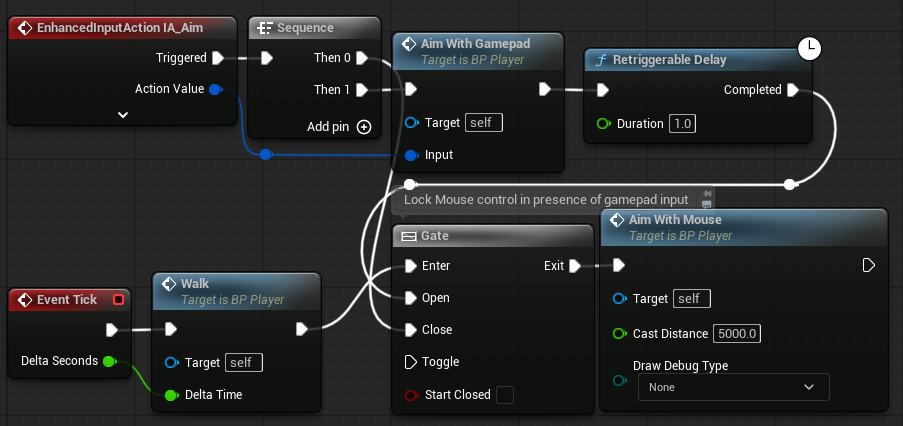
a Gate node can lock out the mouse controls, while a Retriggerable Delay unlocks it after the controller becomes inactive
Simply put, when the gamepad controls are used to aim the player, it locks out the mouse controls using a Gate node. Though, we use Retriggerable Delay in order to unlock that Gate node after the gamepad becomes innactive. Retriggerable Delay ensures that multiple calls to it (each time the controller is moved to aim) only resets the clock. The last thing added was a way for our PlayerController to detect the delta of the mouse location, and for Aim With Mouse to only aim if the mouse actually moved (so a static mouse doesn’t grab the player’s aim after switching from controller to mouse mode).
Health, Barrier, Game Over
Afterwards, I began adding health and barrier (shield) to the player. This starts off by simply creating two variables on the player to store each of the values. Unreal already has a damage system, so we just borrowed that to apply damage accordingly to the player’s barrier or health.
When the player receives damage from the enemy’s attack, damage is routed to the barrier’s durability first. When it is depleted, the player gains a brief moment of invincibility, where damage is ignored. Finally, if the player receives damage while the barrier is depleted, the rest is dealt as damage to the player’s health.
Another teammate had already created UI widgets to display the player’s health and barrier durability, so I simply routed those displays to update as the values change. they also created a game over screen, so I hooked that up to spawn when the player loses all of their health.
Upgrading spells
A little minor feature added, but sets up a lot of the important groundwork for later on, is a system to apply upgrade to spells. The way I went about this is by creating an enum to represent each upgrade aspects of a spell (not all spells support all aspects, but makes it easier to deal with over raw numbers or strings), then a variable is added to the spells that is a map with that enum as the key, and a number representing the aspects level as the value.
As an example, I’ve added a “multishot” aspect to the projectile skill, which increases the number of bullets shot at a time.
Enemy Spawning / Wave System
The next big feature needed for our prototype, was for a method of spawning enemies and tracking enemy waves. The designer envisioned the spawners will continuously spawn at the start of the wave, not exceeding 200 enemies and it stops after 60 seconds. Then after the player kills all enemies standing, the next wave begins.
So, Spawners are basic actors in the scene, given a list of enemies to choose from and spawn periodically. But to start or stop them from spawning more enemies (as enemy cap is reached or wave ends), I’ve created a spawn manager. Each time the spawner wants to spawn an enemy, it tries to increments a count on the spawn manager. If the count is at max, it just skips spawning. The spawner also counts down the duration of the wave and shuts down all spawners when the wave timer completes. Then starts back all those spawners when the next wave begins.
The last part was creating a quick UI to showcase the wave status and progress as well as the wave number. Created using a 1 second long timeline to interpolate the progress bar (except you scale the timeline’s speed by the duration you want). I also had it change color depending on whether the wave is during the actual wave or in cooldown (as the player enters a new wave).